Extracting trials
First of all, generate timing files for all your data files. These should contain only relevant entries (irrelevant entries can be filtered out during creation) as described on the marker analysis page. A (part of a ) typical timing file of an event related setup would look something similar to this, each marker value other than zero indicating the beginning of a trial in the experiment: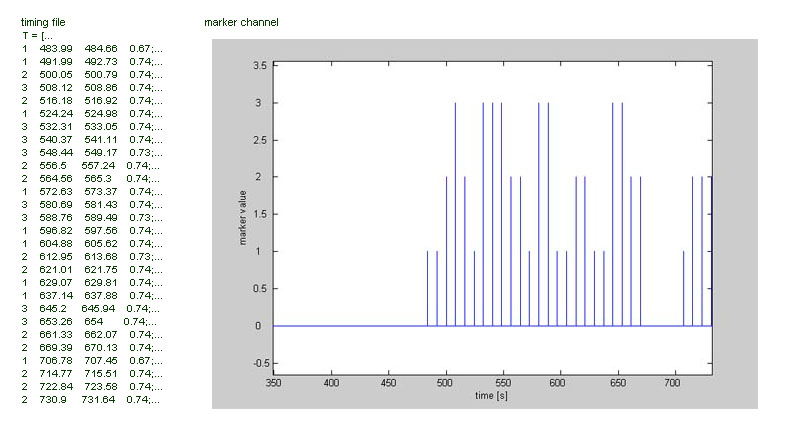
Second, create and load a batchfile of the data files, to work on (see creating batchfiles). This should be a list of filepaths of your RAW (!) data files, that you have already processed. ANSLAB will generate paths of the mat-files, belonging to these raw files, automatically, and include data from these mat-files if it can find them in the corresponding sub-folder. Then configure the trial extraction using the options dialog as shown below.
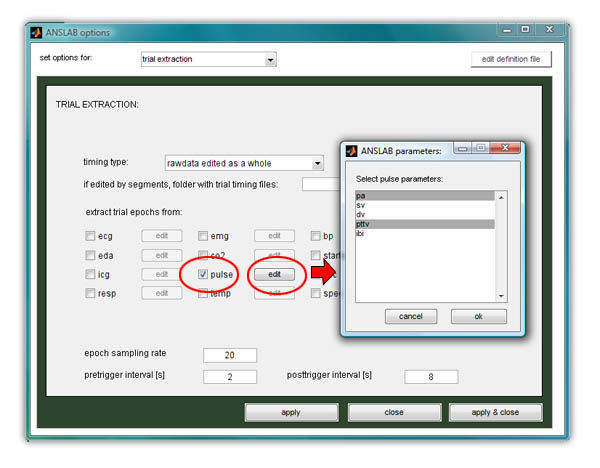
Select the timing type that was used for editing the signals: when editing files as a whole (loading all the available data), the appropriate mode is "rawdata edited as a whole". When editing has been done segment by segment, "rawdata edited by segments" is the correct choice. In the latter case, trial extraction timing files must be different from the timing files used for editing, but cannot both live in the same rawdata directory. Therefore you need to supply an additional directory, where trial timing files are stored and read from. Both timing files should be relative to file start (which is the way they are generated by default). ANSLAB will calculate the relative offsets in the edited segments automatically. From the choice of channel types check the ones you wish to extract data from. For each channel, push the associated "edit" button to highlight specific parameters to extract. Only highlighted parameters will be considered. If you select to extract multiple channels or parameters at the same time, they will be stored together as evoked responses. This only makes sense if you have little missing channels/parameters for specific subjects, as files with unequal number of channels cannot be analysed together later on. If that is the case however, or if you wish to have channels in separate files anyway, repeat the procedure separately for each channel (moving the resulting data files out of the way to avoid overwriting of the files). In the given example we chose to extract pa (pulse amplitude) and pttv (pulse transit time) from the "pulse" channel.
Next, enter the number of seconds to extract before segment begin ( the "pretrigger interval", which can be regared as baseline) and after segment begin (the "posttrigger interval" which you might call response). Timing is measured relative to the segment begin, the segment end is ignored. You also can specify which temporal resolution ANSLAB should apply when extracting trials (for most extracted psychophysiological variables, you will not need a sampling rate higher than 25Hz). As can be guessed from the timingfile shown above, trials in the example are short (~ 5s) with a relatively small intertrial interval. Therefore we chose to extract 2s as baseline and 8s as response. Note that extracting too much data is usually better than extracting too little, as you can still ignore parts of the data later on.
Finally, you can select 'extended trial extraction' in the 'event'-menu to start the extraction process.
Starting with ANSLAB 2.5, the extended trial extraction is the recommended
option. However, the former dialog based extraction is still available
with the \Event\extract trials command and will set the above options based on
dialog questions on the ANSLAB command window. Please note that this
trial extraction will always export the standard set of
parameters - you cannot enable or disable signals separately
ANSLAB then starts looking for result files, writing messages in the command window and to a textfile. If everything runs correctly, ANSLAB will create a set of new files for every raw data file in the list:
You can in turn load and display all .ans-files by setting the dataformat
to 'ANS' and opening them just like if you were editing artifacts. Cell-files contain the original trials in chronological order. Opening a Cell-file as
ANS-dataformatted file from the example above gives you the shown output:ANSLAB then starts looking for result files, writing messages in the command window and to a textfile. If everything runs correctly, ANSLAB will create a set of new files for every raw data file in the list:
- a .Cell.ans file, that contains all 'trials with all variables that could be found for the selected data types
- a set of condition averages stored in .at?.ans files, with ? corresponding to the condition number that the file contains (at standing for average in time)

This is the first trial found in the Cell file, and thus the chronologically first extracted trial. It is 10 seconds long (2s before, 8s after segment begin), and it contains two ecg channels (ibi and twa), and 1 emg and eda channel. You can browse through the trials using the segment navigation buttons (use the >>-button to jump to the last trial and see how many trials are in the Cell-file).
Opening the averaged response for condition 1 (the .at1.ans) looks like this:
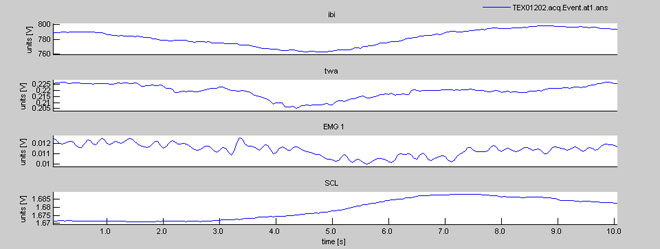
You can see that the ibi stair function now looks much smoother than before. As it is an averaged response across all trials belonging to condition 1, you can no longer browse through trials in an at-ans-file, there is only 1 response stored in it.
[Top]